> For the complete documentation index, see [llms.txt](https://wiki.polymaker.com/llms.txt). Markdown versions of documentation pages are available by appending `.md` to page URLs; this page is available as [Markdown](https://wiki.polymaker.com/polymaker-wiki/polymaker-wiki-pt/dicas-de-impressao/problemas-comuns-de-impressao/wobble-no-eixo-z.md).
# Wobble no eixo Z
Quando há wobble no eixo Z, a peça mostra pequenos deslocamentos repetidos de camada, às vezes em praticamente toda a altura. Mesmo com o slicer bem ajustado, esse defeito não some, porque a causa está na mecânica da impressora.
### **Aperte o carriage da extrusora e o conjunto do hotend**
Essa é provavelmente a causa mais comum. O carriage da extrusora vibra durante a impressão e, com o tempo, pode afrouxar parafusos e conexões.
Máquinas mais simples costumam usar peças impressas ou soluções mecânicas menos rígidas, o que aumenta a chance de folga aparecer com o uso.
Verifique com frequência se há folga no hotend, no carriage e nas peças que prendem esse conjunto. Se houver jogo mecânico, esse defeito tende a aparecer.
Se apertar os parafusos não resolver, veja se as peças impressas estão gastas ou fora de tolerância. Em alguns casos, será preciso substituí-las.
### **Troque rolamentos gastos e elimine folga em roldanas**
Se o carriage ainda balança mesmo com hotend e extrusora firmes, o problema pode estar nos rolamentos.
Esse problema é mais comum em máquinas com guias lineares por barra lisa. Em impressoras com roldanas sobre perfil de alumínio, como várias estilo Ender, vale ajustar a porca excêntrica até a roldana ficar firme, mas sem travar.
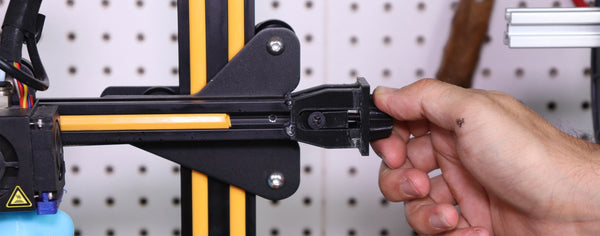
When doing this rattle test on a printer with smooth rods, you should be able to see if there is a small gap in the X bearings.
Replacing the bearings on a 2 year old printer fixed the issue instantly. These were on Lulzbot TAZ 5 machines that used plastic bearings. The replacement bearings had no free play and gripped the linear rods tight.
If you are using a less expensive machine that uses zip ties or something similar to hold the bearings in place, you will need to replace these with new zip ties, or find a part online to print that will hold the bearings tight. Most have come to prefer linear rails just to reduce this ever becoming an issue.
### **Garanta que hotend e bico estejam montados corretamente**
Quase todo hotend exige aperto final com o conjunto aquecido.
Com o aquecimento, o metal expande e pequenas folgas podem aparecer entre bico, bloco e heatbreak. Isso pode gerar vibração e defeitos visuais.
Normalmente, o aperto final deve ser feito com o conjunto quente, por volta de `240 °C`, usando ferramentas adequadas e muito cuidado.
Também é importante não apertar demais. Essas peças podem quebrar com facilidade, especialmente quentes.
If you still are experiencing your hotend is rattling and you have made sure it’s harness is tight, you will likely need to upgrade or replace your nozzle, heat block, or entire hotend. Poorly made parts will not have tight tolerances and can lead to these gaps in your threads. You can try to save money if you want, but we only suggest to purchase from reputable manufacturers for this reason.
### **Elimine folga na mesa**
A mesa também precisa estar firme. Qualquer folga ali pode aparecer como wobble.
When using a Cartesian machine, free-play or rattling in the build plate will result in Z-wobble, just as it would with rattling in the hotend. When not printing, and with the bed at room temperature, give it a good rattle up and down and left and right. The print bed should not have any movement other than what comes from the whole machine moving. If the print bed has some free play in the bearings, rollers, or harness, this will need to be fixed.
On an old inexpensive DIY machines, the build plate harnesses were attached to the bearings via zip-ties. These zip ties seem to stretch over about a month or two of printing.
Just as with the carriage, you will need to replace any plastic bearings that have become worn out over time (unless using a linear rail system). For printers with rollers such as the Ender 3, you will want to rotate that nut until the rollers are holding onto the frame tight.
Finally, make sure that the parts that are connecting the bearings to the build plate are securely tightened and up to tolerance. Take your glass or other print surface off, and then tighten all of the screws that are connecting everything. These, as with all other screws, will loosen over time.
### **Aperte as correias**
Depois de eliminar folgas, a próxima causa mais comum costuma ser correia frouxa.
As explained elsewhere in our 3D printing tips, it is possible to over tighten a belt, but it is pretty difficult to do so on low end machines where the belt is just held together via zip ties. Both the X and Y axis belts should be very springy to the touch with zero-droop.
If there is any droop in your belt, you will need to tighten. For low end, non-upgraded machines, cut the zip tie that is holding the belt together, grab some pliers, and pull tight as you put on a new zip tie. Make sure the belt is tighter than it was and that the zip tie is pinching everything so that the belt won’t slip.
We always suggest adding a belt tensioner to printers that do not have them, and luckily the popular Ender 3 V2 has these stock. Just tighten these belts until they are springy to the touch. A loose belt will definitely lead to Z-wobble and other issues.
There is likely a file on Thingiverse for your specific machine setup if you do not have these belt tightening knobs.
Be careful when adding one of these, since you will now be able to over tighten. Just turn the knob until the belt is very springy to the touch. There is no real scientific way to do this, you just want to make sure there is zero droop whatsoever.
### **Veja se há hastes tortas ou instáveis**
Hastes roscadas finas, como M5 ou M6, são mais propensas a vibrar ou entortar com o tempo.
The instability is easily observed by moving the printer up and down along the Z-axis. Wobbling Z-rods can be stabilized using anti-wobble couplings; however, these are not a substitute for replacing bent rods or upgrading to thicker leadscrews. Heavily bent rods, though uncommon unless the machine is frequently transported, require replacement.
Several models available on Thingiverse and elsewhere, such as the "anti-wobble coupling" by toolson, can help mitigate wobble in threaded Z-axis rods; these work effectively, but they are unable to fix an actually bent rod, and upgrading to thicker leadscrews provides a superior solution.
### **Use uma porca anti-backlash**
Essas porcas ajudam bastante a eliminar folgas no movimento do eixo Z.
This is slightly confusing as to explain, but with these springs and added nuts, you can expect a lot less rattling and prints looking as if they have Z-wobble. Please take note of the pitch of your leadscrew since you will need to make sure your anti-backlash parts are the same. The majority of 8mm leadscrews have a pitch of 2, but you will just need to confirm with your printer specs (or with the part you buy online when upgrading).
Also make sure you are able to actually use these on the printer you are adding them too.
### **Lubrifique guias e fusos**
Your X and Y axis guide rods should be smooth enough so that both carriages can move around freely (when using a linear rod printer). Your Z-axis guide rods (the ones that are not threaded) should also be smooth enough for the carriage to move in the Z-direction without any skipping or any bearings getting stuck.\
Most printers use self-lubricating bearings, but even these will require lubrication after frequent printing. If your bearings are getting stuck or having trouble moving during the print, you can experience some Z-axis wobble.
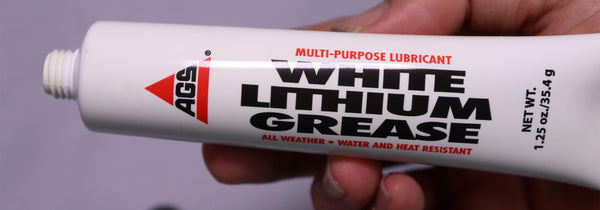
Get some white lithium grease apply with a rag to these non-threaded guide rods. Move the carriage around on all axis’s so that it spreads across your bearings. This should help with the issue.
Just another reason for linear rails, they should not require any additional lubrication.
Along with the smooth rods, you should also add a bit of lubrication to the threaded rods/leadscrews. Just grab some lithium grease on a rag and rub it up and down. You want to make sure these threaded rods aren’t entirely dry to the touch.
### **Garanta que a mesa se mova com suavidade**
Se a mesa estiver difícil de mover, isso também pode gerar perda de passo e artefatos que se parecem com wobble.
### **A peça é alta e fina demais?**
Em impressoras cartesianas, peças muito altas e finas podem balançar simplesmente por causa do movimento da mesa.
This wobble will make the top of your print have this Z-wobble, while the bottom of your print looks just fine.
To be honest – there is no perfect way around this. You can manually design some anchors onto your print so that as it gets taller, it is held further in place, but just printing a very tall skinny part as is will likely result in this Z-wobble.
If unable to design in some further anchors, you are often forced to cut extremely thin display parts in two, to be glued together post printing.
Below is a summary of how to add a very simple anchor to your part via Cura.
### **Ancorando peças altas e finas**
Uma forma simples de reduzir isso é ancorar a peça no slicer usando geometria de suporte adicional.
Below is an example of two skinny swords from a Deadpool model. When not adding any anchors, a Cartesian machine would wobble the build plate back and forth and cause the top half of these swords to look extremely ugly (if they didn’t get knocked off entirely).
Cura now allows you to bring in a second model that intersects with your main print. They also allow you to print a part entirely as support. This means you can drag in a second object that acts only as support for your main structure.
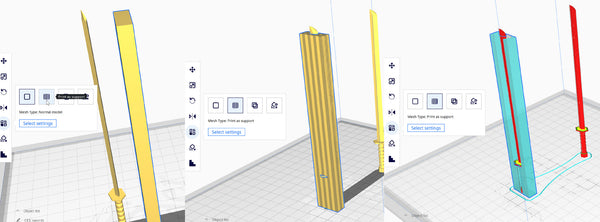
This rectangle in the example above is thin, so it won’t take up too much material, yet it will extend the anchoring for the sword. After bringing in a shape that will work for your model, you can choose the model and click “Per Model Settings” and then “Print as Support”
After turning the shape into “Print as support”, you can then drag it over your tall, skinny print.
As you can see in “Layer Mode”, this entire shape is now support structure that can help to anchor your tall skinny print to help prevent this wobbling back and forth.
As mentioned – there are likely other ways to do this, this is just the simplest way we know of since it allows you to do this right in your slicing software.
## **Resumo para corrigir wobble no eixo Z**
* Aperte parafusos e elimine folgas no hotend e no carriage.
* Troque peças gastas, rolamentos ruins e hastes tortas.
* Aperte correias e roldanas corretamente.
* Lubrifique guias e fusos.
* Confira se a mesa se move com suavidade.
* Use porca anti-backlash ou upgrades no eixo Z se necessário.
* Em peças altas e finas, considere âncoras ou dividir o modelo.
---
# Agent Instructions
This documentation is published with GitBook. GitBook is the documentation platform designed so that both humans and AI agents can read, navigate, and reason over technical content effectively. Learn more at gitbook.com.
## Querying This Documentation
If you need additional information that is not directly available in this page, you can query the documentation dynamically by asking a question.
Perform an HTTP GET request on the current page URL with the `ask` query parameter, and the optional `goal` query parameter:
```
GET https://wiki.polymaker.com/polymaker-wiki/polymaker-wiki-pt/dicas-de-impressao/problemas-comuns-de-impressao/wobble-no-eixo-z.md?ask=&goal=
```
`ask` is the immediate question: it should be specific, self-contained, and written in natural language.
`goal` is optional and describes the broader end goal you are ultimately trying to accomplish on behalf of the user. GitBook uses it to tailor the answer towards what is most useful for that goal.
The response will contain a direct answer to the question and relevant excerpts and sources from the documentation.
Use this mechanism when the answer is not explicitly present in the current page, you need clarification or additional context, or you want to retrieve related documentation sections.